
Par Maxime Ancellin.
Today, I have the opportunity to make my first blog post!
Our topic of the day will be automated dependency management and its use cases.
It is true that use cases are the most interesting aspect to explore when discussing a tool or technology.
We all know several tools that assist us in our daily activities.
However, we don’t all have the same needs, and this is where experience comes into play to determine what suits us best.
This post is therefore based on personal experience and has been formatted to fit a blog entry.
Through this topic, we aim to answer the following questions:
If you have these questions, you’re in the right place!
Before we begin, what do we mean by a dependency?
In our technical professions, we work with numerous concepts and tools.
In a project, one could recode all the elements necessary for its proper functioning, but this would be tedious and very difficult to maintain over time (a lot of code and knowledge to manage).
To address this, we use a set of resources shared by companies or the community that we can include/utilize in our projects.
This is what we call dependencies.
Most modern languages/technologies use dependency managers to orchestrate different resources and their versions.
We can easily list:
Regarding dependencies, there are countless examples.
Here are some particularly popular packages:
With the DevOps methodology, the world of infrastructure is becoming increasingly aligned.
Solutions that allow for deploying infrastructure “As Code” use the same principles.
This is the case with:
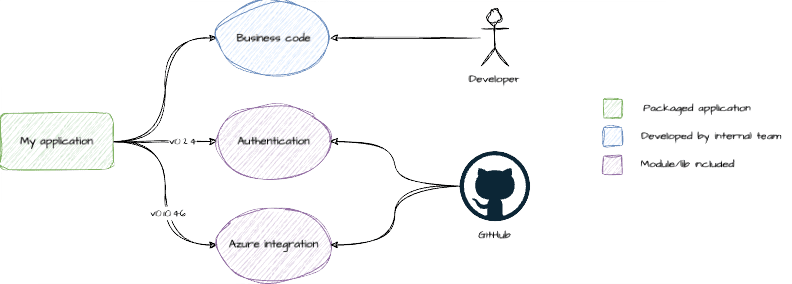
Here is a small illustration that diagrams how this works within the context of an application project.
Dependencies offer numerous advantages and significantly simplify our work.
However, they also create a real challenge in keeping packages updated and fixing security vulnerabilities.
We can use tools (npm, pip, etc.) to update them, but this involves a manual process.
In an environment with numerous Git projects and microservices, this represents a lot of work to keep everything up to date.
This is where our topic begins.
To address this issue, there are tools that can do this work for you.
Many solutions are available on the market, but we will focus on the two main ones here.
These are the two solutions widely adopted by the community.
Indeed, they allow for quick installation and do not necessarily require configuration.
This tool is specifically designed for use with GitHub, in a SaaS (Software as a Service) mode.
With this direct integration with GitHub, DependaBot offers a turnkey solution for dependency management, optimizing workflow, enhancing efficiency, and improving security.
The strength of DependaBot lies in its simplicity and very quick integration with your GitHub projects.
Just like DependaBot, it is designed to be used in SaaS mode on GitHub (for the Mend.io version).
There is also an Open Source version that allows you to self-host Renovate via a container in a CI/CD pipeline, on a container orchestrator, or install it on a machine via NPM.
This provides better privacy and finer control over credential management.
Strengths of Renovate:
However, it can be more complex to configure but offers greater freedom.
As you might have guessed, Renovate is the tool I recommend to address our problem.
Its great flexibility, the ability to self-host, and having the OpenSource code are clearly advantages.
It works like bellow:
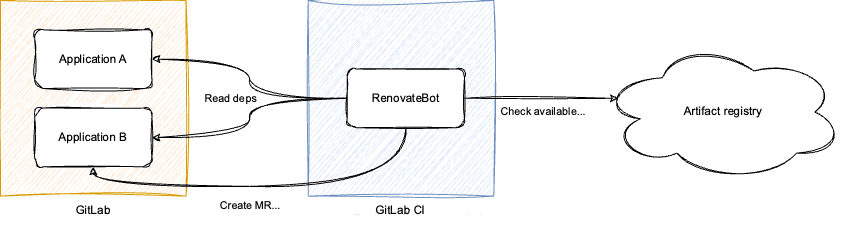
As mentioned earlier, the time spent on manual package management is not time that can be used for value-added tasks.
However, we are compelled to perform these tasks for reasons of Security or Technical Debt, or we can choose to ignore them (Obviously, I do not recommend this; obfuscation is never the right solution).
From a security standpoint, this allows us to continuously track updates. Therefore, we can even instruct Renovate to automatically merge new patches to ensure that fixes are applied promptly.
Caution, this can potentially cause issues if the updates to your dependencies are unreliable.
Now that we no longer need to manually update packages on each project, we can focus on code production.
Furthermore, with a robust CI/CD pipeline, we can also ensure that updates do not introduce regressions.
This means that technical debt related to packages should no longer accumulate and may even be reduced over time.
Caution, during implementation, there may be a significant number of generated pull requests.
It’s important to manage this workload or gradually activate Renovate’s levels/features.
If you want to integrate Renovate (or DependaBot for GitHub) into your projects, you can find the steps to follow at the links below:
Now that your Renovate Bot is set up on your Git instance,
we will see how to configure it for standard use cases.
You may have noticed that after integrating the tool, a Pull Request was made on all your Git repositories to add a renovate.json file that includes the configuration to apply to your repo.
The file created by Renovate is the basic configuration.
You can find information about it on the presets page of their GitHub.
Here is the translated text in American professional English:
As I mentioned earlier, it is not always easy to handle all the “Pull Requests” that will be proposed by Renovate during its setup.
Therefore, we have the option to enable only the features we want.
For example, below we enable only the handling of Dockerfile
{
  "enabledManagers": [
    "dockerfile"
  ]
}
The list of available managers can be found in the documentation.
You can also add a number of automations, such as assigning people for reviews or automatically merging certain updates.
Here is an example of an extended configuration:
{
    "packageRules": [
        {
            "matchManagers": ["github-actions"],
            "commitMessageTopic": "Chore(ci): {{depName}} update",
            "automerge": true,
            "automergeType": "pr-comment",
            "automergeComment": "LGTM!"
    }
  ]
}
Above, we define a specific configuration for “Pull Requests” related to “GitHub Actions”.
We have defined the following elements:
github-actionsChore(ci): {{depName}} updateLGTM!You can find all Renovate configurations in the official documentation.
Obviously, we don’t want to set up our configuration for all our Git projects individually.
This would bring us back to the situation where it becomes complicated to manage all dependencies across all Git projects.
For this, we can create a set of shared configurations in a Git project (similar to those provided by Renovate).
This allows us to use a single configuration from other projects and thus work on just one file for all our projects.
We can then use the following configuration (in the case where we are on GitLab):
{
  "extends": [
    "gitlab>MyOrganization/my-awesome-project/renovate-bot//configurations/configuration-file-without-extension"
  ]
}
You can find other configurations in the
config-presetssection of the documentation.
In the next article, we will see how to use Renovate in a GitOps workflow and automate staging/production deployments.