By Yann Albou.
Working with Kubernetes on a local machine when you are a Dev or an Ops is not as easy as we could think. So, how to easily create a local Kubernetes cluster that would meet these needs ?
At SoKube we heavily use k3d and k3s for these purposes.

More than a year ago I presented in a previous blog what is k3d (with k3s) and how to use it.
In the meantime, k3d has been completely rewritten.
The goals of this blog post are to show:
k3s is a very efficient and lightweight fully compliant Kubernetes distribution.
k3d is a utility designed to easily run k3s in Docker, it provides a simple CLI to create, run, delete a fully compliance Kubernetes cluster with 1 to n nodes.
K3s includes:
The choices of these components were made to have the most lightweight distribution. But as we will see later in this blog, k3s is a modular distribution where components can easily be replaced.
Recently k3s has joined the Cloud Native Computing Foundation (CNCF) at the sandbox level as first Kubernetes Distribution (raising a lot of debates whether or not k3s should be a kubernetes sub-project instead).
Installation is very easy and available through many installers: wget, curl, Homebrew, Aur, … and supports all well known OSes (linux, darwin, windows) and processor architectures (386, amd64) !
Note that you only need to install the k3d client, which will create a k3s cluster using the right Docker image.
Once installed, configure the completion with your preferred shell (bash, zsh, powershell), for instance with zsh:
k3d completion zsh > ~/.zsh/completions/_k3d
source .zshrcIn one year, the k3d team did a great job and completely rewrote k3d v3. It is therefore not a simple major version, they have implemented new concepts and structures to make it an evolving tool with very practical and interesting features.
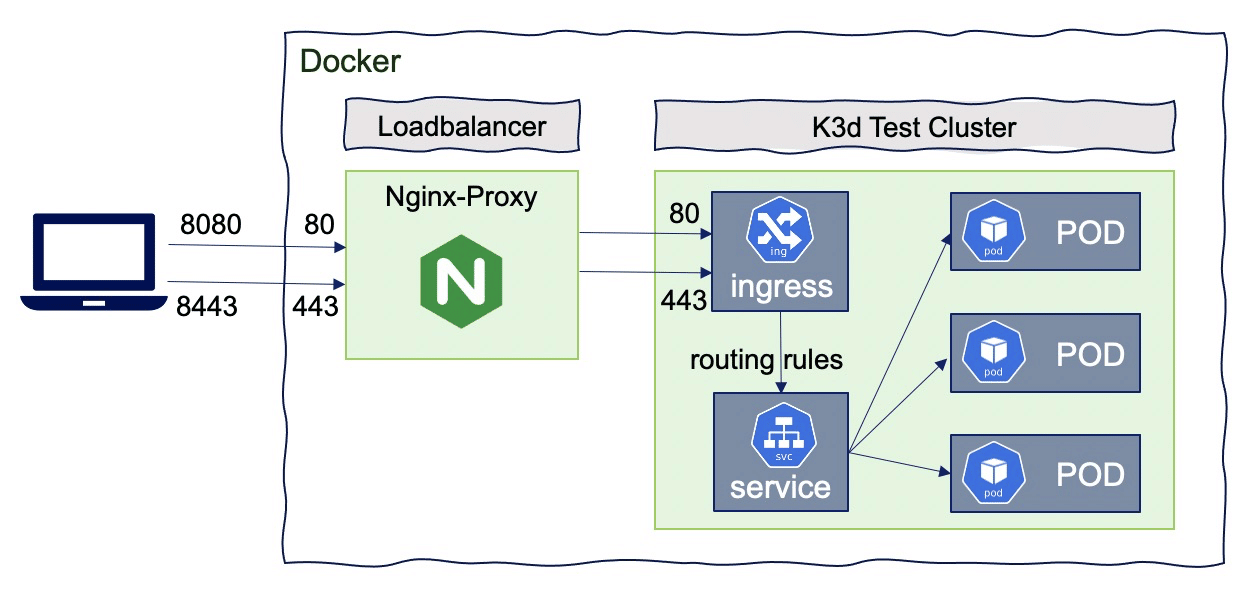
k3d create/start/stop/delete node mynodeLet’s create a simple cluster with 1 loadbalancer and 1 node (with role of server and agent) with name “dev”:
k3d cluster create dev --port 8080:80@loadbalancer --port 8443:443@loadbalancerdocker ps will show the underlying containers created by this command:


Ports mapping:
--port 8080:80@loadbalancer will add a mapping of local host port 8080 to loadbalancer port 80, which will proxy requests to port 80 on all agent nodes--api-port 6443 : by default, no API-Port is exposed (no host port mapping). It’s used to have k3s‘s API-Server listening on port 6443 with that port mapped to the host system. So that the load balancer will be the access point to the Kubernetes API, so even for multi-server clusters, you only need to expose a single api port. The load balancer will then take care of proxying your requests to the appropriate server node-p "32000-32767:32000-32767@loadbalancer": You may as well expose a NodePort range (if you want to avoid the Ingress Controller).Kubeconfig:
~/.kube/config” is automatically updated.(checkout “kubectl config current-context”)--update-default-kubeconfig=false" so it will need to create a kubeconfig file and export the KUBECONFIG var:
export KUBECONFIG=$(k3d kubeconfig write dev)k3d provides some commands to easily manipulate the kubeconfig:
# get kubeconfig from cluster dev
k3d kubeconfig get dev

# create a kubeconfile file in $HOME/.k3d/kubeconfig-dev.yaml k3d kubeconfig write dev

# get kubeconfig from cluster(s) and
# merge it/them into a file in $HOME/.k3d or another file
k3d kubeconfig merge ...
Lifecycle:
k3d cluster stop devk3d cluster start devk3d cluster delete devOnce the cluster running, execute the following commands to test with a simple nginx container:
kubectl create deployment nginx --image=nginx
kubectl create service clusterip nginx --tcp=80:80
cat <<EOF | kubectl apply -f -
apiVersion: networking.k8s.io/v1beta1
kind: Ingress
metadata:
  name: nginx
  annotations:
    ingress.kubernetes.io/ssl-redirect: "false"
spec:
  rules:
  - http:
      paths:
      - path: /
        backend:
          serviceName: nginx
          servicePort: 80
EOF
To test : http://localhost:8080/
For testing purposes and to be as close as possible of a production kubernetes cluster you can create a multi-servers and/or a multi-agents cluster:
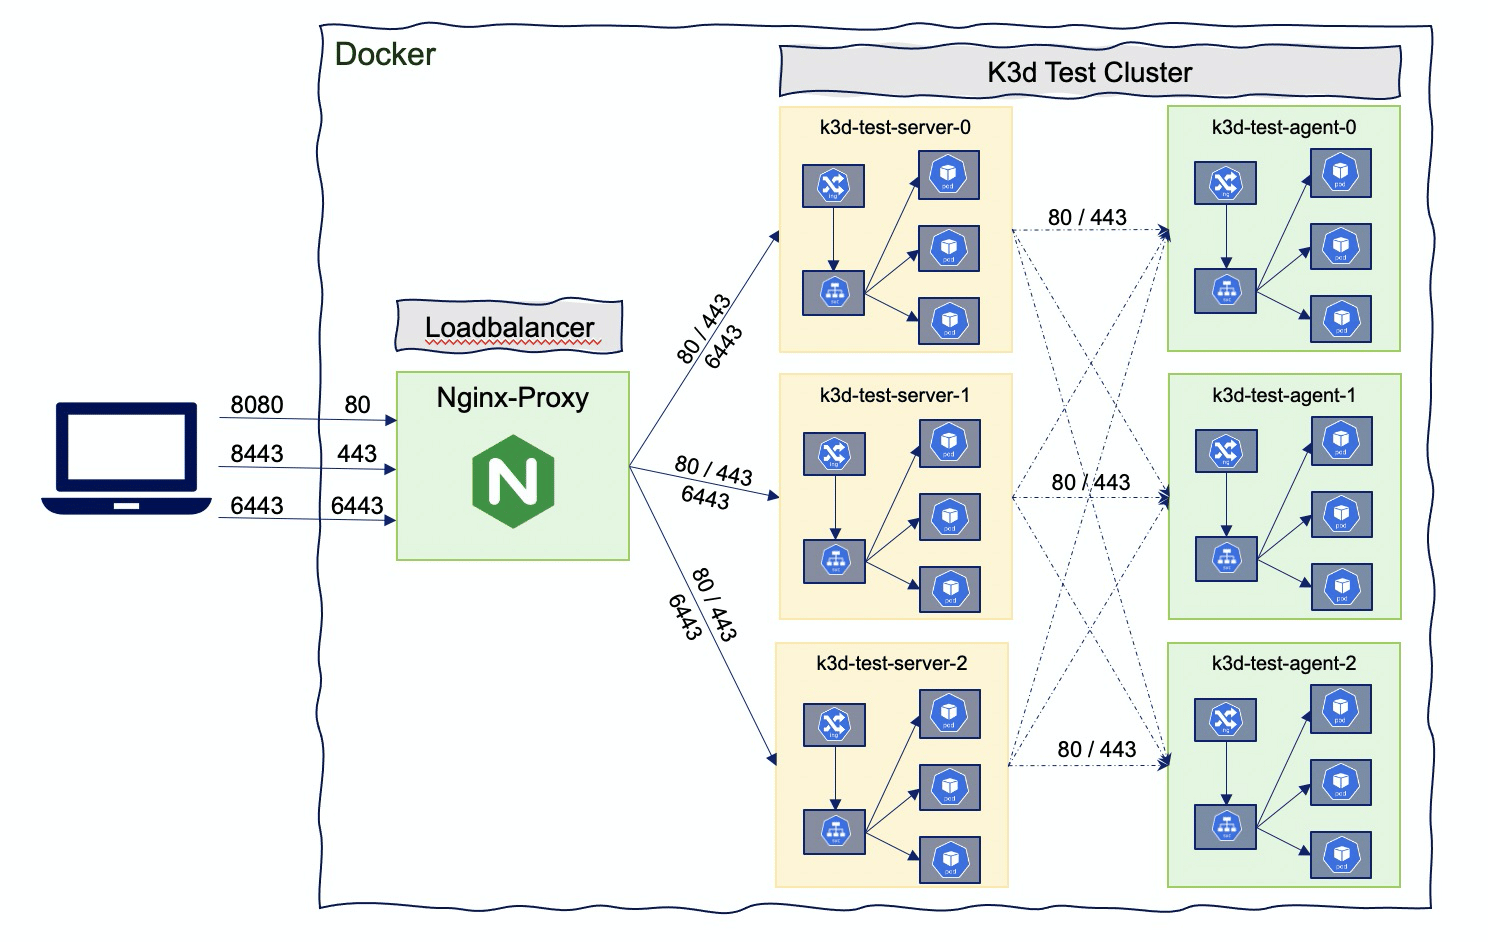
k3d cluster create test --port 8080:80@loadbalancer --port 8443:443@loadbalancer --api-port 6443 --servers 3 --agents 3Get the list of nodes:
> kubectl get nodes
NAME                STATUS   ROLES    AGE   VERSION
k3d-test-agent-1    Ready    <none>   20m   v1.18.2+k3s1
k3d-test-agent-0    Ready    <none>   21m   v1.18.2+k3s1
k3d-test-agent-2    Ready    <none>   20m   v1.18.2+k3s1
k3d-test-server-2   Ready    master   21m   v1.18.2+k3s1
k3d-test-server-0   Ready    master   21m   v1.18.2+k3s1
k3d-test-server-1   Ready    master   21m   v1.18.2+k3s1
Once all node are running you can deploy the same nginx application for testing.
Scale the application to 3 replicas:
kubectl scale deployment nginx --replicas 3 Pods should be spread over the agent nodes:

This cluster contains 7 Docker images representing the full cluster test (1 lodbalancer, 3 containers for the servers and 3 containers for the agents).
Note that server nodes are also running workloads:

After the cluster has been created it is also possible to add nodes:
k3d node create newserver --cluster test --role agentIt could be very convenient to create a Kubernetes cluster with a specific version, either for a older version:
k3d cluster create test --port 8080:80@loadbalancer --port 8443:443@loadbalancer --image rancher/k3s:v1.17.13-k3s2or a newer version:
k3d cluster create test --port 8080:80@loadbalancer --port 8443:443@loadbalancer --image rancher/k3s:v1.19.3-k3s3The list of available versions are in the k3s docker repository. Currently, the oldest version in this repo is V1.16.x.
Flannel is a very good and lightweight CNI plugin but doesn’t support the Kubernetes network policy resources (note that the NetworkPolicy will be applied without any error but also without any effect) !
The modularity of k3s allows to replace the default CNI by Calico. In order to deploy Calico, 2 features of k3s are used:
--k3s-server-arg '--flannel-backend=none': remove Flannel from the initial k3s installation./var/lib/rancher/k3s/server/manifests will automatically be deployed to Kubernetes in a manner similar to kubectl applySo you will need to save locally the calico.yaml file configuration and then create the cluster with the following args:
k3d cluster create calico --k3s-server-arg '--flannel-backend=none' --volume "$(pwd)/calico.yaml:/var/lib/rancher/k3s/server/manifests/calico.yaml"Test:
# create 2 pods 'web' and 'test'
kubectl run web --image nginx --labels app=web --expose --port 80
kubectl run test --image alpine -- sleep 3600

# check pod "test" can access pod "web"
kubectl exec -it test -- wget -qO- --timeout=2 http://web
Everything should be ok
Let’s add a NetworkPolicy that denies all communications:
cat <<EOF | kubectl apply -f -
kind: NetworkPolicy
apiVersion: networking.k8s.io/v1
metadata:
  name: web-deny-all
spec:
  podSelector:
    matchLabels:
      app: web
  ingress: []
EOF

# check pod "test" cannot access pod "web"
kubectl exec -it test -- wget -qO- --timeout=2 http://web
Now, the “web” pod cannot be accessed anymore !
By default k3s uses Traefik v1 as an Ingress controller but it is an old version and Traefik V2 has been released more than 1 year ago with lots of nice features, such as TCP Support with SNI Routing & Multi-Protocol Ports, Canary deployment, Mirroring with Service Load Balancers, new Dashboard & WebUI…
There are plans to replace by default this ingress controller with Traefik v2 but again the modularity of k3s makes it possible to replace the default Ingress Controller using:
--k3s-server-arg '--no-deploy=traefik' : to remove traefik v1 from k3s installationReplace using Nginx ingress controller:
Create a local “helm-ingress-nginx.yaml” file:
# see https://rancher.com/docs/k3s/latest/en/helm/
# see https://github.com/kubernetes/ingress-nginx/tree/master/charts/ingress-nginx
apiVersion: helm.cattle.io/v1
kind: HelmChart
metadata:
  name: ingress-controller-nginx
  namespace: kube-system
spec:
  repo: https://kubernetes.github.io/ingress-nginx
  chart: ingress-nginx
  version: 3.7.1
  targetNamespace: kube-system
then create the cluster with the nginx Ingress Controller
k3d cluster create nginx --k3s-server-arg '--no-deploy=traefik' --volume "$(pwd)/helm-ingress-nginx.yaml:/var/lib/rancher/k3s/server/manifests/helm-ingress-nginx.yaml"Replace using traefik v2 controller
Create a local ‘helm-ingress-traefik.yaml’ file:
# see https://rancher.com/docs/k3s/latest/en/helm/
# see https://github.com/traefik/traefik-helm-chart
apiVersion: helm.cattle.io/v1
kind: HelmChart
metadata:
  name: ingress-controller-traefik
  namespace: kube-system
spec:
  repo: https://helm.traefik.io/traefik
  chart: traefik
  version: 9.8.0
  targetNamespace: kube-system
Then create the cluster with the Traefik v2 Ingress Controller
k3d cluster create traefik --k3s-server-arg '--no-deploy=traefik' --volume "$(pwd)/helm-ingress-traefik.yaml:/var/lib/rancher/k3s/server/manifests/helm-ingress-traefik.yaml"By default k3s uses the DockerHub to download images, but it could be very convenient to use your own Docker registry
In this example, a very simple registry (the one from Docker) will be created as a pull through cache :
# you should create a volume and mount it i /var/lib/registry
# but for simplicity I created a container without SSL config
docker run -d --rm --name registry -p 5000:5000 -e REGISTRY_PROXY_REMOTEURL="https://registry-1.docker.io" registry:2
Create a local file “registries.yaml” with the following content:
# more info here https://k3d.io/usage/guides/registries
# https://rancher.com/docs/k3s/latest/en/installation/private-registry/
mirrors:
  "docker.io":
    endpoint:
      - http://host.k3d.internal:5000
  "host.k3d.internal:5000":
    endpoint:
      - http://host.k3d.internal:5000
# Authentication and TLS can be added
# configs:
#  "host.k3d.internal:5000":
#    auth:
#      username: myname
#      password: mypwd
#    tls:
#        we will mount "my-company-root.pem"
#        in the /etc/ssl/certs/ directory.
# ca_file: "/etc/ssl/certs/my-company-root.pem" host.k3d.internal: As of version v3.1.0, the host.k3d.internal entry is automatically injected into the k3d containers (k3s nodes) and into the CoreDNS ConfigMap, enabling you to access your host system from inside k3s nodes (running inside Docker) by referring to it as host.k3d.internal.
After the creation of a k3d cluster, you can check this config through:
kubectl -n kube-system get configmap coredns -o go-template={{.data.NodeHosts}}Then create the k3d cluster using this registry:
k3d cluster create test --volume "${PWD}/registries.yaml:/etc/rancher/k3s/registries.yaml" --port 8080:80@loadbalancer --port 8443:443@loadbalancerAll images (including those used internally by k3d and k3s) will be uploaded to the docker registry, you can check the contents of your registry via
curl http://localhost:5000/v2/_catalog The deployment of an nginx image will also be downloaded via the Docker registry:
kubectl create deployment nginx --image=nginxUsing "host.k3d.internal" comes in handy in other situations where you want to access a service that is on your machine or even a service that is in another k3d cluster.
You can find several ways and tools to work with a local Kubernetes cluster, among these:
Today, my preference goes to k3d because it combines simplicity, extreme lightness, modularity and functionality while allowing more sophisticated needs to be addressed.
But things are moving very quickly with some cool and innovative features. And new projects like k0s also look very promising.
Other alternatives or tools to consider for the dev usecase:
The Rancher team did again a great job rewriting k3d making it very easy, modular, simple and efficient to run several instances with different topologies of k3s Kubernetes clusters on a single machine.
Usages are multiples and very adapted to Kubernetes development, testing and training.
k3s is a serious production distribution that also addresses the world of edge computing and IoT by creating less energy-consuming and more compact architectures allowing to evolve towards GreenIT.
Additionally, the underlying Kubernetes k3s distribution is the Cloud Native Computing Foundation‘s (CNCF) first Kubernetes distribution.
Its future is extremely promising, to be continued …